In this post, we are going to talk about MITRE ATT&CK® technique T1001 – Data Obfuscation. As the name indicates, this technique consists in making data, usually sent over Command and Control (C&C) communications, more difficult to detect and decode. There are countless ways to do that, but here we are going to focus on disguising payloads – which can simply be information, but also files written as malware or scripts – as images.
Why would someone do that? Mainly because every day lots of images are downloaded when a user is surfing the internet. Downloading an image-like file therefore blends perfectly into regular traffic and does not stand out for a network security control that, for instance, blocks the download of Windows binaries or PowerShell scripts, or does not look for malicious content in an image file. Since these files do not show up as executable, they can fly under the radar of an antivirus or endpoint detection and response (EDR) capability more easily.
Below we will show three examples of how to obfuscate data into image files, namely:
- Adding a JPEG header to the data;
- Appending the data to a JPEG image; and
- Embedding the data into a PNG image using Least Significant Byte (LSB) steganography.
At first look they might seem simple, but we have vetted them in our labs and they proved to be effective. From a Mimikatz sample that was being detected by the security tools we had in place, for example, all of its obfuscated versions went undetected. It is a simple but powerful way to send and receive data without anyone noticing it.
In the following examples, we will discuss real world malware that has used images in their command and control communications, and we will discuss a number of AttackIQ scenarios that can be used to test defensive capabilities to detect and prevent image-based malware. Finally, we will show you how to obfuscate (and de-obfuscate) your file of choice into images using these techniques so that you can customize your own tests.
Building a JPEG-like File: Naive Approach
The simplest way to build a file that looks like a JPEG is to set its header accordingly. As you may know, besides using a given extension (i.e., .jpg, etc.), the file type is also determined by the first bytes of the file – that is, the header or file signature. Many controls (such as allowing or blocking file uploads or downloads) are based on analyzing these bytes and determining the file type to which they correspond. In case of JPEG files, the file signature can be (among other variants) one of these sequences:
- FF D8 FF DB
- FF D8 FF E0 00 10 4A 46 49 46 00 01
- FF D8 FF EE
If we add one of these sequences of bytes to the beginning of a file, and change the extension to .jpg, it will look as if it is an actual JPEG file. The image, however, will not be valid: when displayed with any image viewer, we will not see anything. This is because the data does not conform to the JPEG standard, which must follow a given syntax and structure. This might be sufficient to bypass many security controls. To recover the original file, however, we only need to remove the added signature, which is quick and simple.
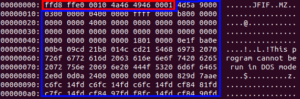
Hex dump of a Windows executable (blue) obfuscated with a JPEG header (red)
This obfuscation method might seem simple, but it has been used by threat actors successfully in the past. One example is APT29’s MiniDuke backdoor [1], where the malware communicates with the command and control server using HTTP requests and uses this technique to conceal the contents of the exchanged data.
If you want to try it out with the AttackIQ Security Optimization Platform, check out the following scenarios:
- Download Mimikatz Sample Obfuscated with JPEG Header to Memory;
- Save Mimikatz Sample Obfuscated with JPEG Header to Disk;
- Download Invoke-Mimikatz.ps1 Obfuscated with JPEG Header to Memory; and
- Save Invoke-Mimikatz.ps1 Obfuscated with JPEG Header to Disk.
As you can see, we have two different samples: a Mimikatz executable, and the Invoke-Mimikatz script from the post-exploitation framework Empire. In both instances we have a scenario that downloads the file to memory without ever reaching the disk (which is meant to test network security controls), and a scenario that saves the file to the disk (which is meant to test antivirus and EDRs). The result of the obfuscated data is not a valid image.
Obfuscating Data Into a Real Image
A similar approach is to append the data to an existing JPEG image, not only the header. The result, in this case, will be a valid image: if we open it with any image viewer, the original image will be shown. This can hide the malicious file further; it would not raise any suspicions if it were opened by a curious user or analyst. In this case, to recover the original payload, one must know the size of the original image, and then read the bytes after this offset. Alternatively, another option is to put a known marker between the original file and the payload (a given sequence of bytes that will tell us where the payload begins), and take the bytes after this marker. In both cases, the operation is simple and can be done using default system tools like PowerShell.
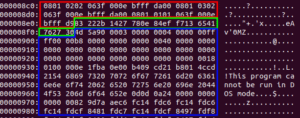
Hex dump of a Windows executable (blue) appended to a JPEG image (red). In between, a custom marker indicating the beginning of the payload (green)
APT29 [2] has used this technique in some of their malware, such as HAMERTOSS (also known as HammerDuke). This backdoor would download images from certain pages, and then obtain encrypted data reading from an offset in the image file. This offset, as well as part of the encryption key to decrypt the data, was obtained from reading tweets of Twitter accounts controlled by APT29. The data was not an executable file in this case, but simply commands to be executed on the victim machine, or login credentials. Another example, not related to APT29, is the malware known as Duqu [3]. This information stealer, closely related to the Stuxnet malware strain, used this technique to exfiltrate files from the infected machines, as well as receive additional binaries to be executed, using HTTP and HTTPS to communicate with its command and control server.
You can assess whether your security controls are able to prevent or detect this technique using the following AttackIQ scenarios:
- Download Mimikatz Sample Obfuscated by Appending it to a JPG file to Memory;
- Save Mimikatz Sample Obfuscated by Appending it to a JPG file to Disk;
- Download Invoke-Mimikatz.ps1 Obfuscated by Appending it to a JPG file to Memory; and
- Save Invoke-Mimikatz.ps1 Obfuscated by Appending it to a JPG file to Disk.
Using Least Significant Byte (LSB) Steganography
In the above two examples, the malicious payload was appended to a JPEG header or JPEG file without any modification. This makes it easy to recover, but also easier to discover. The last example takes obfuscation one step further using Least Significant Byte (LSB) steganography.
An image is composed of many pixels, and the color of each pixel is represented using 24 bits, 8 bits for each primary color (red, green and blue). In LSB steganography, the last bit of each RGB 8-bit chunk is used to store one bit of the desired payload (or, more generically, using the last n bits of each RGB 8-bit chunk so that more data can be stored per pixel). While the result is indistinguishable from the original image to the naked eye, each pixel contains 3 bits of data that can later be collected and rearranged to obtain the original payload. The process of recovery is of course more convoluted than the previous examples, but it is much more difficult to detect.
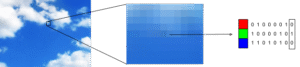
Example of least significant bytes of a pixel. Changing these has an unnoticeable effect on the image
If you think that steganography is only useful for Capture the Flag competitions, some threat actors might disagree. Examples of LSB steganography (with different implementations) seen in the wild include (yet again) APT29’s RegDuke [1], TA459’s ZeroT trojan [4], or some variants of the banking trojan Gozi [5].
You can use the following AttackIQ scenarios to test this technique:
- Download Mimikatz Sample Obfuscated into a PNG File Using LSB steganography to Memory;
- Save Mimikatz Sample Obfuscated into a PNG File Using LSB steganography to Disk;
- Download Invoke-Mimikatz.ps1 Obfuscated into a PNG File Using LSB steganography to Memory; and
- Save Invoke-Mimikatz.ps1 Obfuscated into a PNG File Using LSB steganography to Disk.
Creating Your Own Obfuscated Files
If you want to quickly create more samples using the techniques described above, we have published a Python tool to do that. You will find it on our public repository. You can try with different payloads or images and test your security controls against them. You will have to upload the files in a web server, and then configure one of the scenarios Download File to Memory or Download and Save File with the corresponding URL. Give it a try!
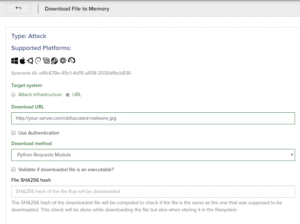
Configuration of the Download File to Memory scenario with a custom obfuscated payload
Conclusion
In this post, we have explained three ways of implementing the Data Obfuscation technique from MITRE ATT&CK, all based on disguising data as images. In each case we showed examples of threat actors using this technique. Finally, we have presented a tool that you can use to obfuscate and de-obfuscate data using these techniques, and build your custom tests with them. Now it’s your turn to create your obfuscated payloads and keep putting your security controls to the test.
References
[1] Matthieu Faou, Mathieu Tartare, Thomas Dupuy (ESET), “OPERATION GHOST. The Dukes aren’t back — they never left,” October 8, 2019, available at https://www.welivesecurity.com/wp-content/uploads/2019/10/ESET_Operation_Ghost_Dukes.pdf
[2] FireEye Labs, “HAMMERTOSS: Stealthy Tactics Define a Russian Cyber Threat Group,” July, 2015, available at https://www2.fireeye.com/rs/848-DID-242/images/rpt-apt29-hammertoss.pdf
[3] Symantec Security Response, “W32.Duqu. The precursor of the next Stuxnet,” Symantec, October 17, 2011, available at: https://www.symantec.com/content/en/us/enterprise/media/security_response/whitepapers/w32_duqu_the_precursor_to_the_next_stuxnet.pdf
[4] Darien Huss, Pierre T, Axel F and Proofpoint Staff, “Oops, they did it again: APT Targets Russia and Belarus with ZeroT and PlugX,” Proofpoint.com, February 2, 2017, available at https://www.proofpoint.com/us/threat-insight/post/APT-targets-russia-belarus-zerot-plugx
[5] Pierre-Marc Bureau, Christian Dietrich, “Hiding in Plain Sight. Advances in Malware Covert Communication Channels,” Dell Labs and CrowdStrike, November 23, 2015, available at: https://www.blackhat.com/docs/eu-15/materials/eu-15-Bureau-Hiding-In-Plain-Sight-Advances-In-Malware-Covert-Communication-Channels.pdf